Provision
Provisioning establishes your automation control plane on RHEL 9 and prepares execution images required by workshop jobs.
Objectives
- Install Red Hat Ansible Automation Platform (containerized) on the workshop host.
- Prepare or import Execution Environment (EE) and Decision Environment (DE) images.
- Validate the platform is ready for deployment workflows.
Step 1: Prepare the RHEL 9 Workshop Host
Install required packages and clone the workshop repository.
sudo dnf update -y
sudo dnf install -y ansible-core
sudo dnf install -y wget git-core rsync vim nano git
sudo dnf install -y podman
sudo dnf install -y python3-pip
Reboot is recommended, but not required.
sudo reboot
Clone the repository.
cd ~
git clone https://github.com/dynatrace-wwse/workshop-destination-automation.git
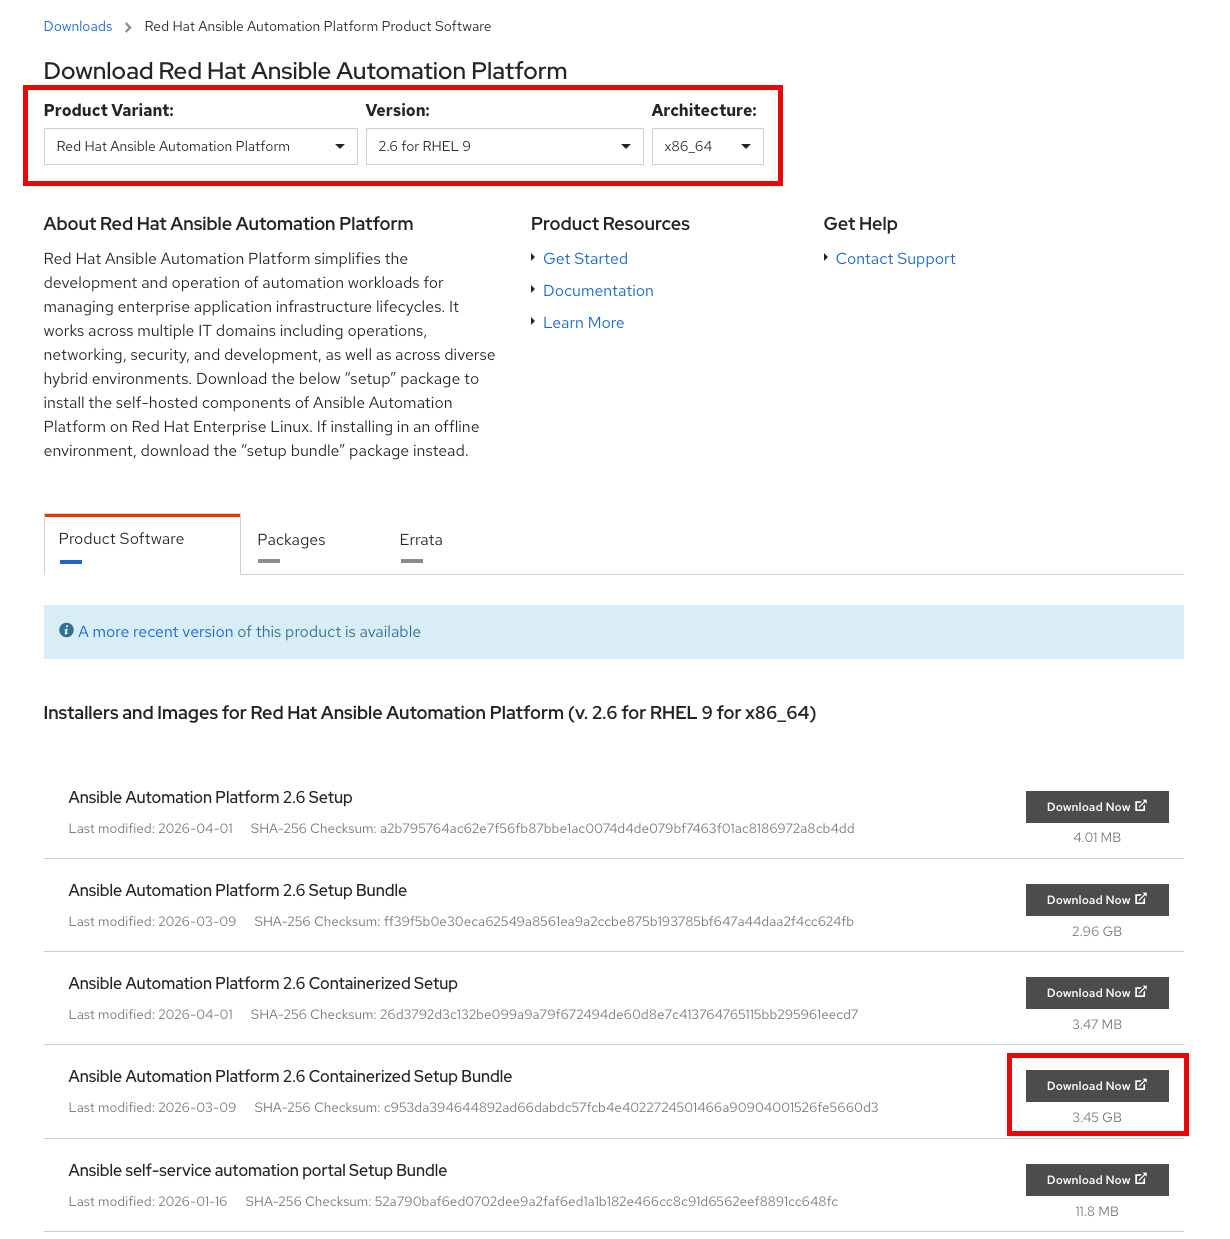
Step 2: Download the AAP Install Tarball
Locate the Ansible Automation Platform 2.6 Containerized Setup Bundle for RHEL 9 at
https://access.redhat.com/downloads, then download it to the host.
mkdir ~/redhat
cd ~/redhat
wget -O ansible-automation-platform-setup-bundle.tar.gz "<your-url-here>"
Step 3: Install AAP Containerized
Move into the workshop ansible directory
cd ~/workshop-destination-automation/ansible
Create AAP target installation directory
export CURRENT_USER=$(whoami)
sudo mkdir /opt/ansible
sudo chown $CURRENT_USER:$CURRENT_USER /opt/ansible
Install ansible-galaxy collections
mkdir -p ~/.ansible/collections
ansible-galaxy collection install -r requirements.yml
Set your required variables and run the install playbook. You may review additional installation variables in the documentation here: AAP Containerized Quickstart
export AAP_PUBLIC_HOSTNAME="<your-public-fqdn>"
export AAP_INSTALLER_LOCAL_PATH="$HOME/redhat/ansible-automation-platform-setup-bundle.tar.gz"
export AAP_ADMIN_PASSWORD="<your-strong-password>"
ansible-playbook provision/playbooks/install_aap_containerized.yml
Time Management Opportunity
Provisioning Red Hat Ansible Automation Platform will take some time. It is recommended to create the Dynatrace Tokens and Credentials while AAP is installing.
After installation completes, you can validate AAP status with the included healthcheck script.
cd ~/workshop-destination-automation/ansible && ./aap_status.sh
Step 4: Apply Subscription and Validate Access
- Open the AAP web console
- https://{AAP-PUBLIC-HOSTNAME}:443/
- You can expect a TLS certificate warning
- Apply your subscription/license
- Confirm Controller and Automation Hub are reachable
Step 5: Build or Import Workshop Images
This workshop requires specific Ansible collections to be included in the Execution Environments and Decision Environments. Use one of the following patterns to make the images available in your AAP/EDA instance.
Option A: Build locally
If you choose to build locally, the default configurations may fail. You will need to troubleshoot this on your own, requiring Ansible and ansible-builder expertise.
ansible-playbook provision/playbooks/build_custom_ee.yml
ansible-playbook provision/playbooks/build_custom_de.yml
Option B: Import prebuilt images (recommended)
Images have been built, tested, and hosted in the GitHub registry for you.
ansible-playbook provision/playbooks/import_custom_ee.yml
ansible-playbook provision/playbooks/import_custom_de.yml
Default image sources are provided in the roles and can be overridden with environment variables.
Validation
- [ ] AAP services are healthy on the host.
- [ ] Controller login is successful.
- [ ] Required EE and DE images exist in Automation Hub and can be referenced later.
Continue to Deploy.